
Background
I introduced the installation and configuration method of Home Assistant in an article in April 2022. At that time, to connect Xiaomi’s many smart homes to HA, we had to install a third-party HA integration, namely Hass-Xiaomi-Miot . It is released on GitHub by an individual developer al-one and has always been our only choice to connect Mijia to HA. Until recently, Xiaomi released the official HA integration on GitHub: HA_Xiaomi_Home , filling the gap of Mijia access to HA.
Although this is another story of “officials forcing a fan to death”, Xiaomi’s open source spirit is still worthy of praise. Compared with third-party integration, Xiaomi’s official integration has better support for its own products and can help us connect Mijia to HA more easily, thereby realizing the interconnection between Mijia and the Homekit ecosystem. Today, we will follow the official document of HA_Xiaomi_Home to introduce in detail the installation and use of this integration.
Install Mijia official integration through HASC
Mijia officially integrates a variety of installation methods, among which the simplest and most novice-friendly method is to install through HACS
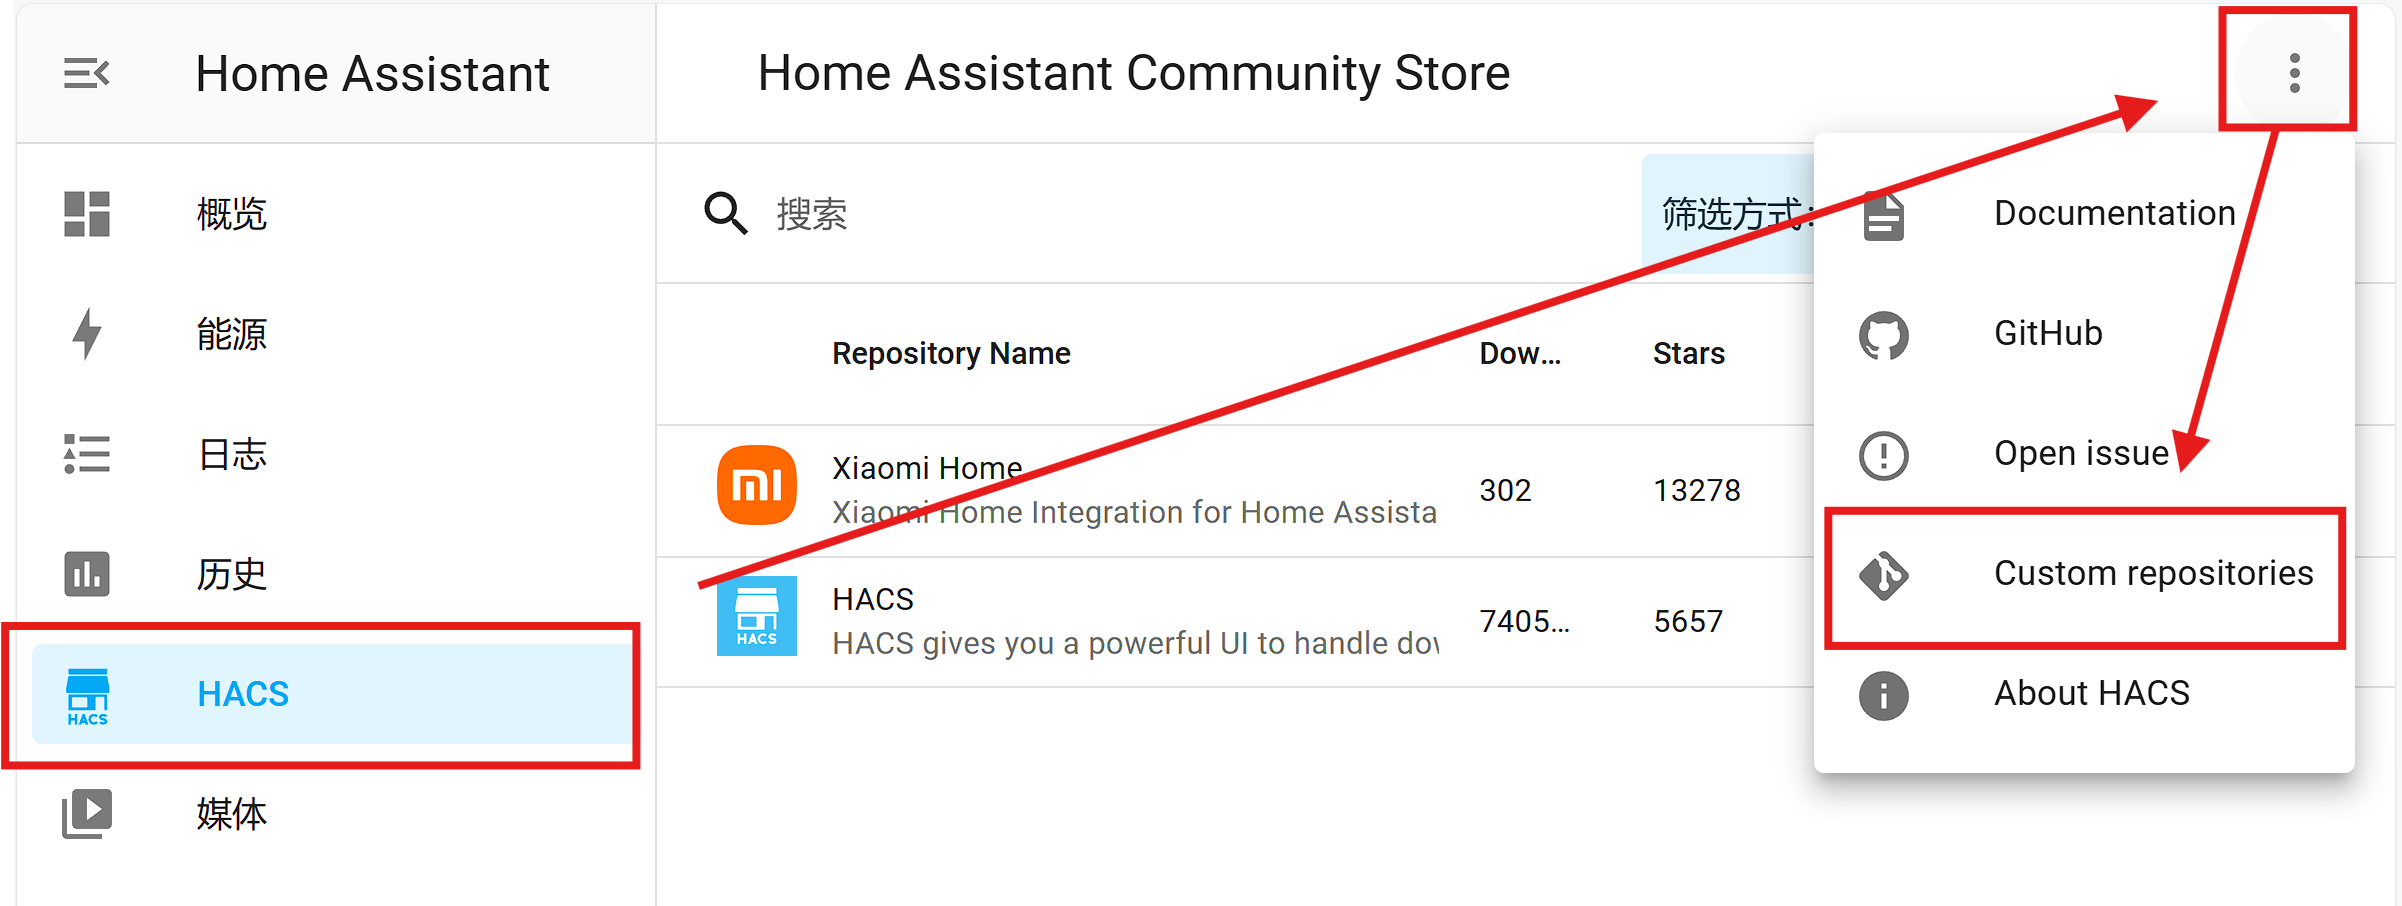
. For details on the installation method of HASC, please refer to my article, and I will not go into details here. Since Mijia official integration has not yet been added to the official library of HASC, we need to add the Mijia official integrated library link to the HASC directory by adding a custom library link. Log in to the HA backend, click HASC on the left, then click the three dots in the upper right corner, select Custom Repositories, and create a new custom library link, as shown in the figure below.
 Select
 Integration for the library type (Catagory); fill in the following link for the library link:
https://github.com/XiaoMi/ha_xiaomi_home.git
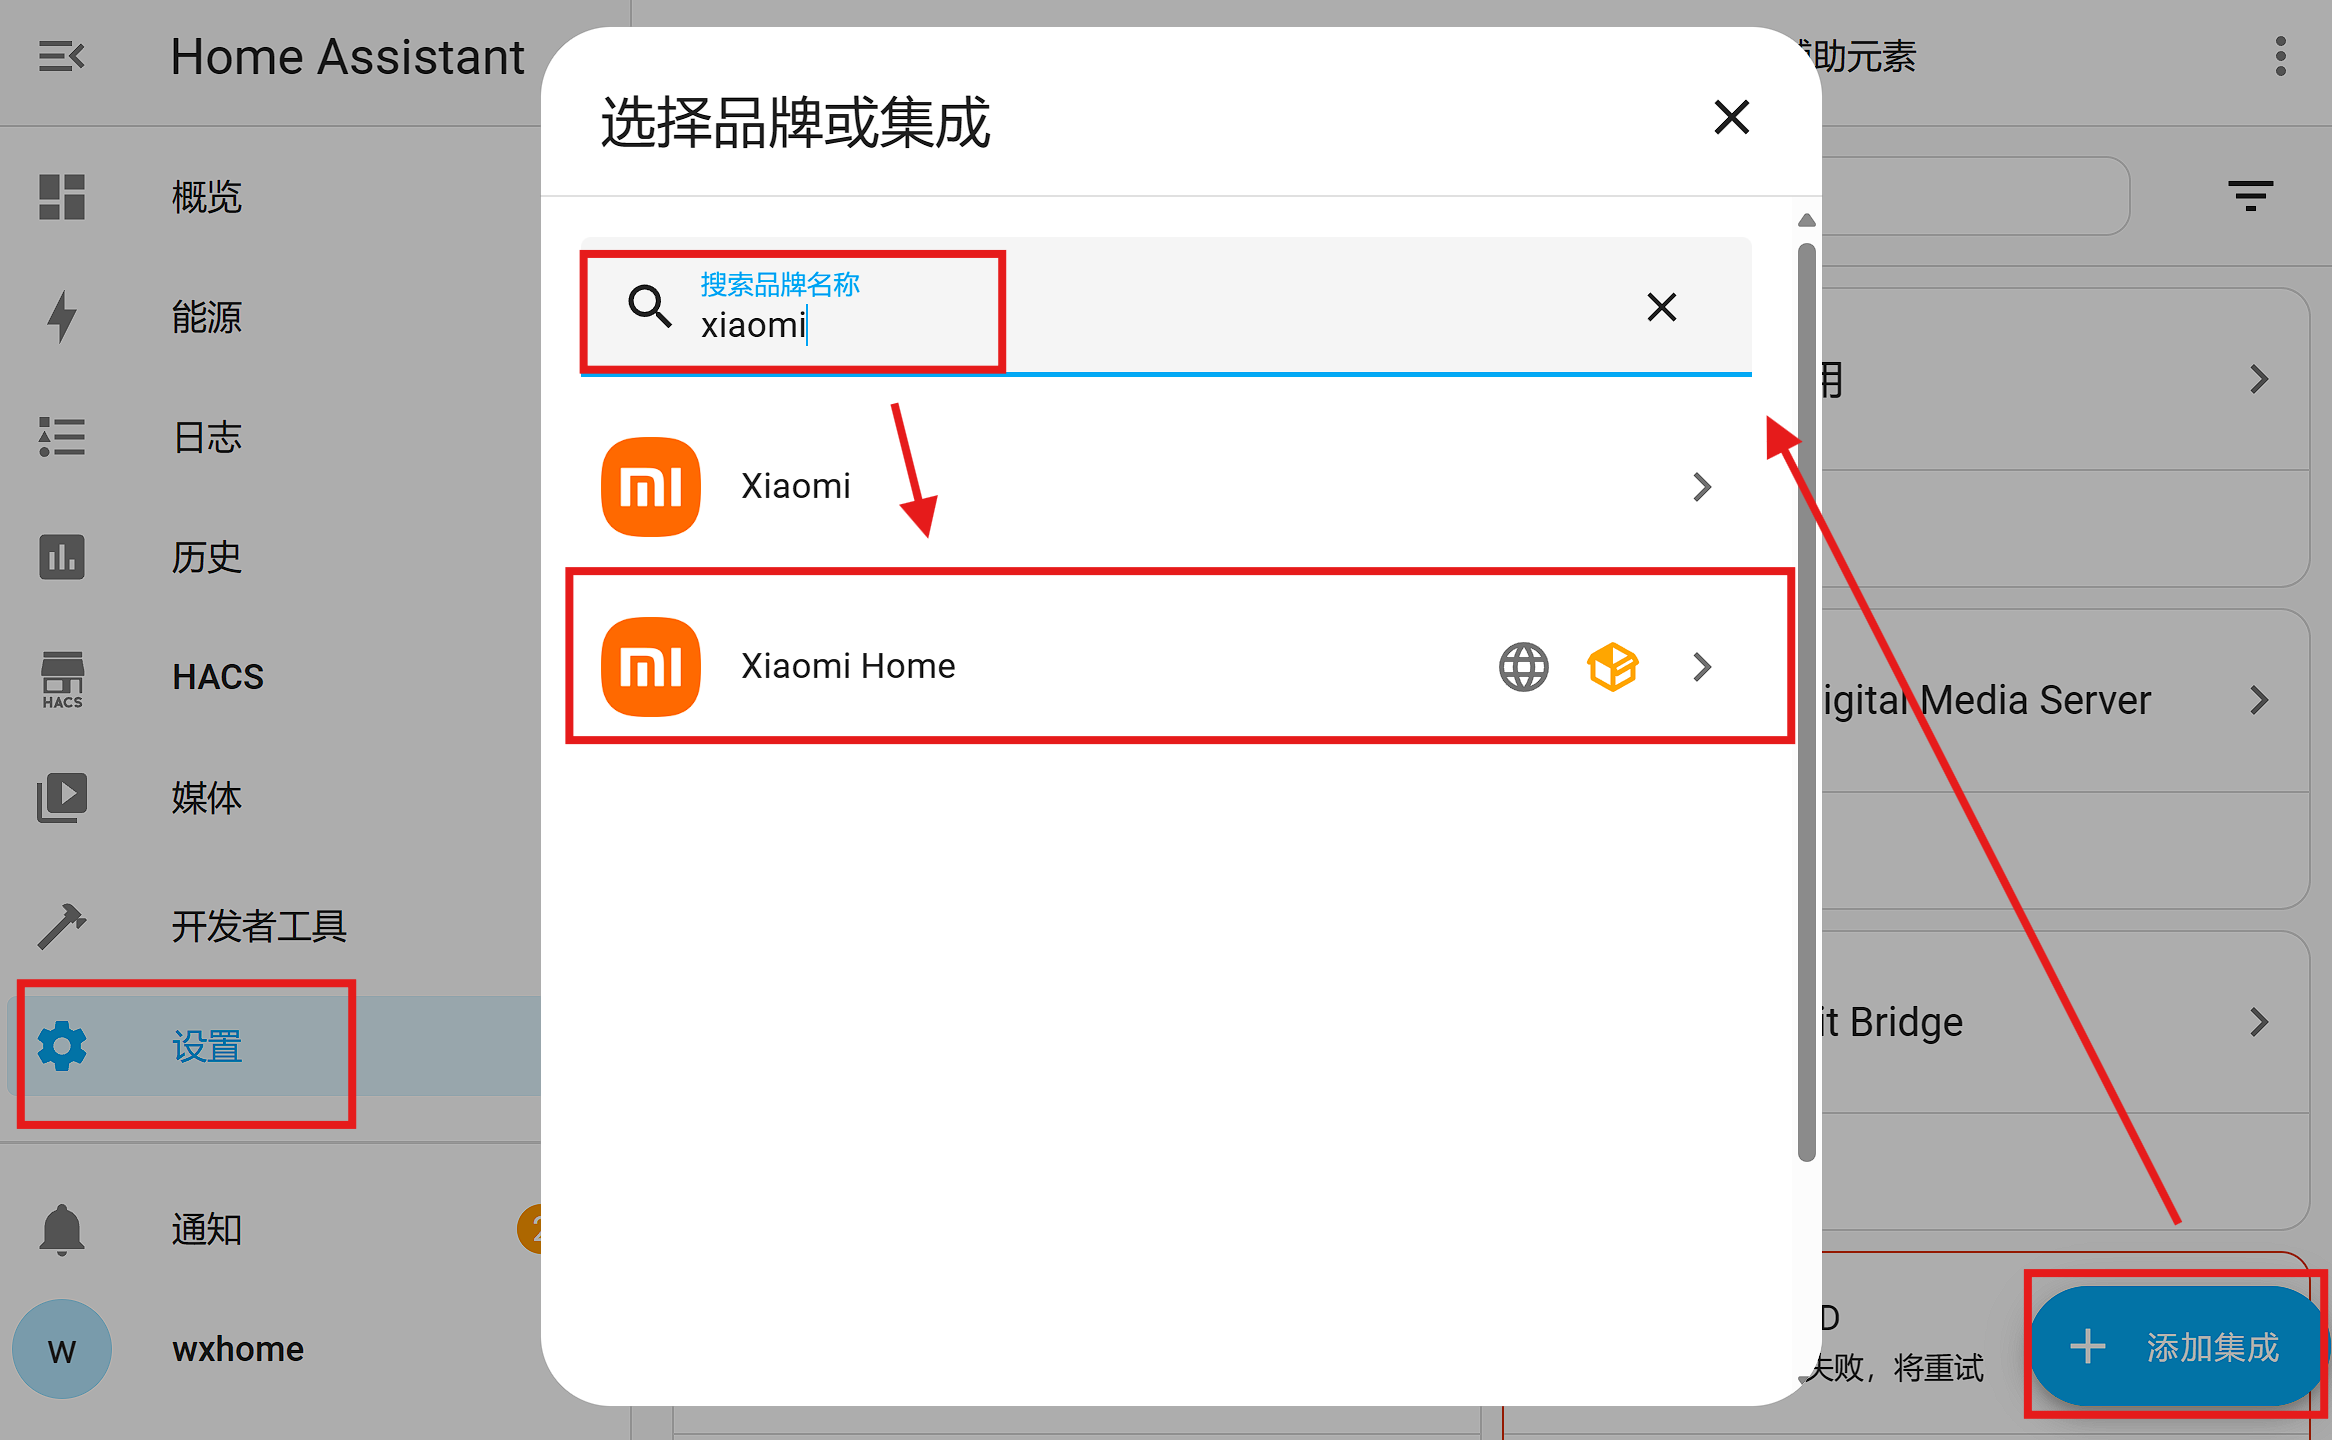
Finally, click the ADD button. If there is no problem with the network, the Mijia officially integrated installation link will be added to the HASC custom directory. Then click Settings - Devices and Integration - Add Integration, enter Xiaomi in the search box, and select XIaomi Home in the pop-up results. Next, follow the prompts to log in to your Mijia account.
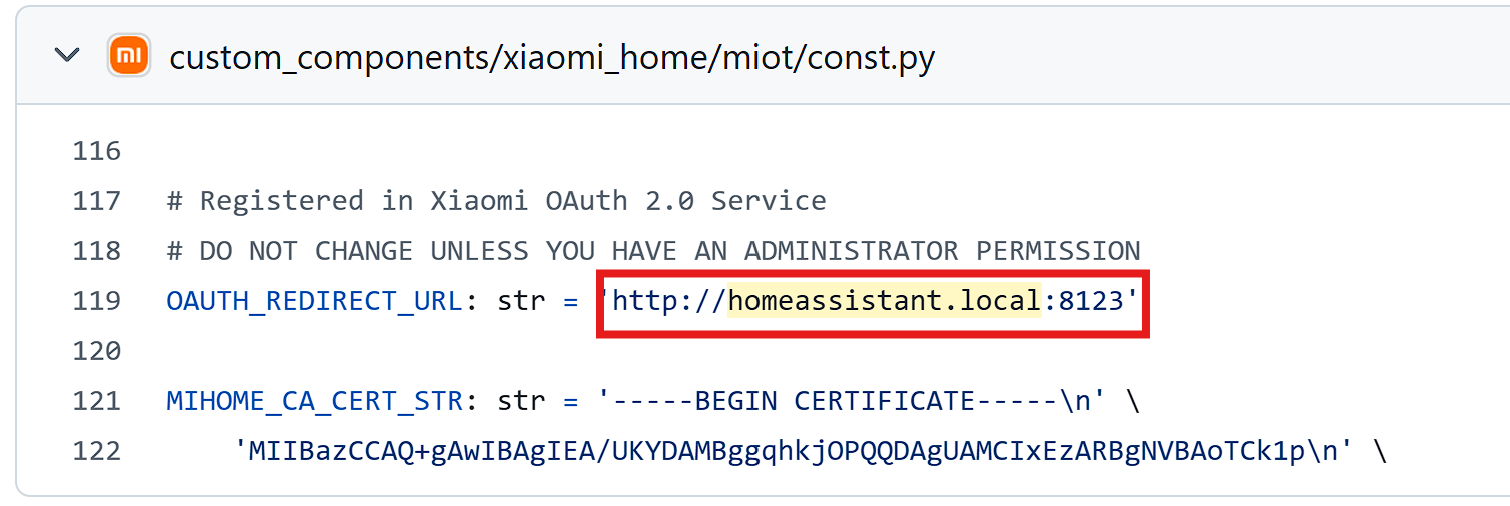
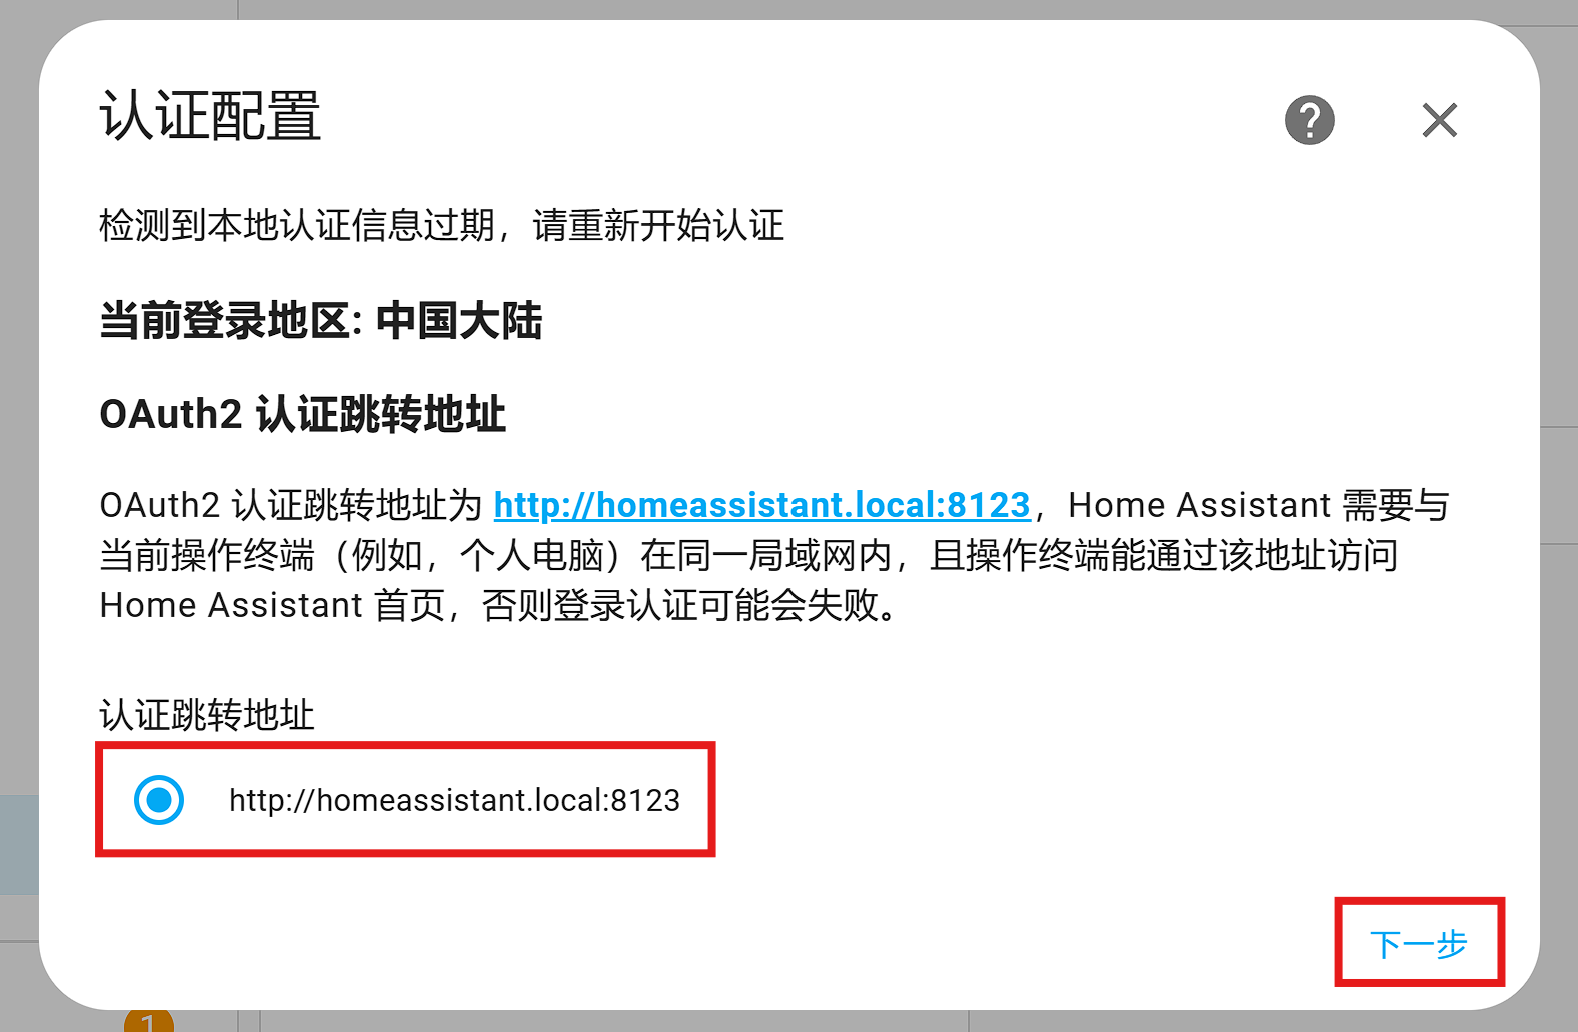 Note: warning:: If you are like me and use Docker as the HA installation environment, then there is a high probability that you will encounter the problem of being unable to jump during Mijia account verification. The core reason why it cannot jump is that the Mijia official integration uses the local domain name
 homeassistant.local:8123 by default to jump back to the HA page, and the HA in the Docker container cannot broadcast the .local local domain name in the local LAN. Therefore, when verifying the Mijia account and jumping back to the HA page, we need to manually change homeassistant.local:8123 in the browser address bar to IP:8123. This will complete the verification of Mijia account. The above method refers to Issue#8
from the Mijia integrated warehouse.
Disable redundant Mijia entities
After we install Mijia official integration and complete account verification, HA will automatically search and add various Mijia devices. At the same time, a tangle of entities will appear in our homes. The so-called entity (Unit) is a concept used by HA to define the smallest sub-functional unit of the device. Usually a device corresponds to multiple entities. For example, a “water heater” device can have multiple entities such as “current water temperature”, “target water temperature”, “preheating switch”, and “boost switch” at the same time.
However, in daily use, we do not need to split each device into many fragmented sub-functional units. This is not only confusing, but also makes our home interface extremely cumbersome. Therefore, before linking HA to Homekit, we need to filter the many entities added by Mijia integration and only retain the switches and values we need most in our daily use.
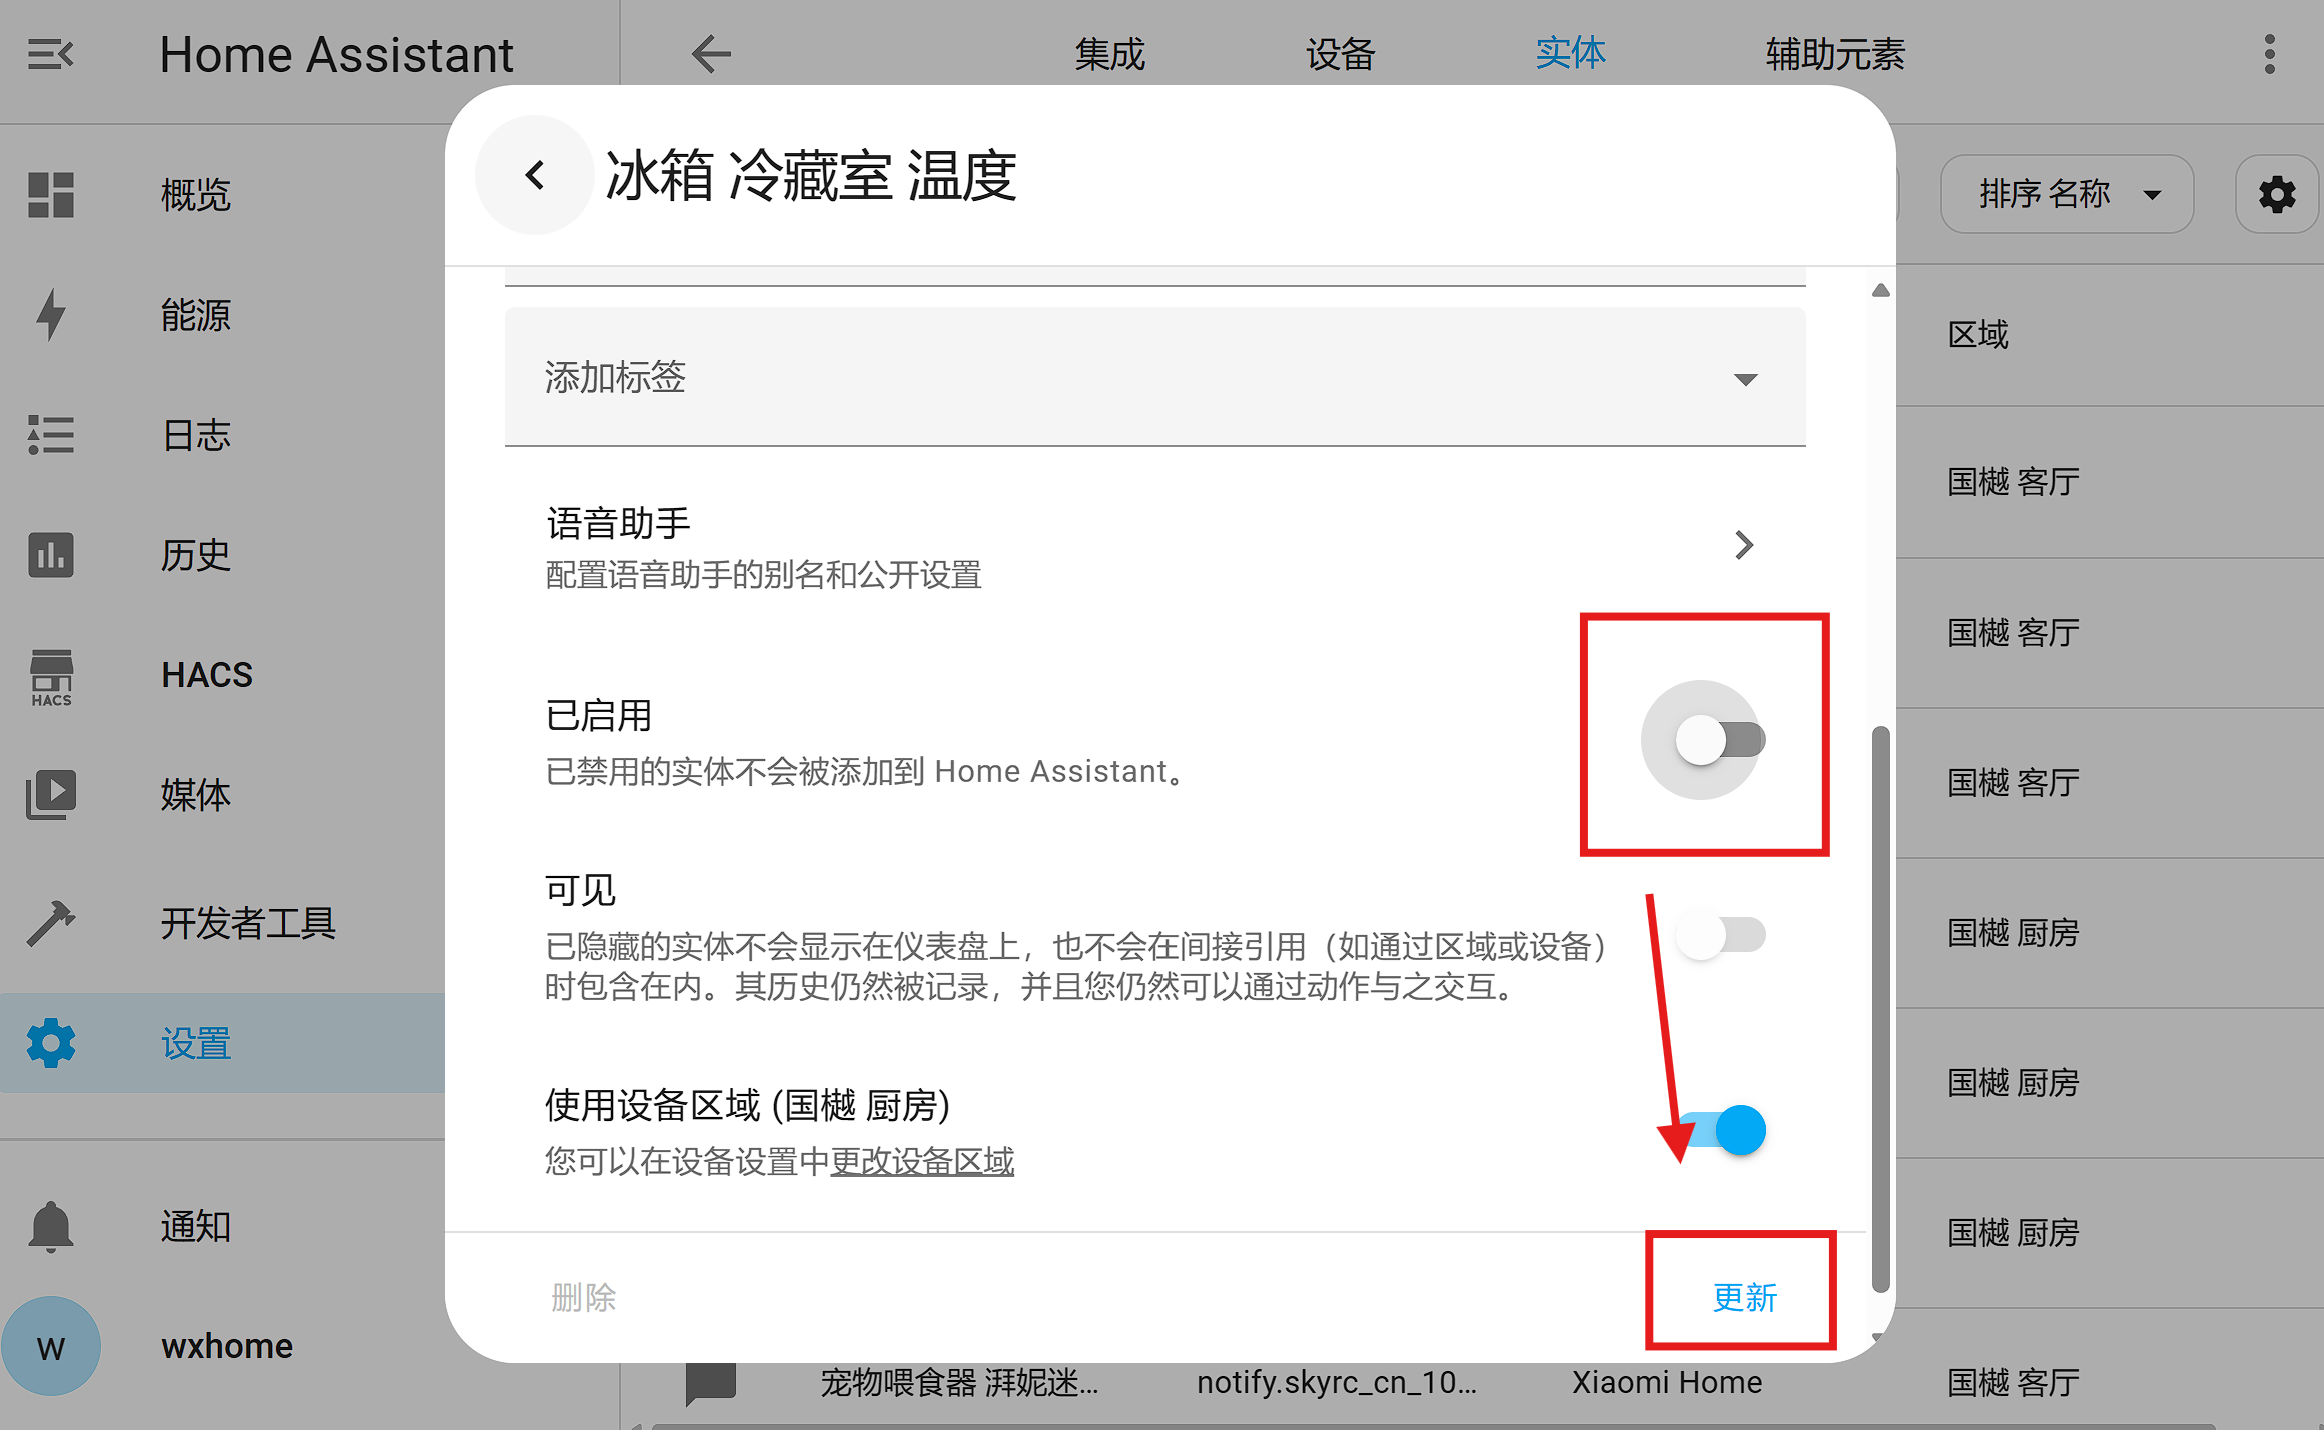
Click Settings - Devices and Integration - Entities, click the entity we don’t need in the list, close the entity in the pop-up dialog box, and finally click Save. In this way, we deactivate an entity that is not needed.
Bridge HA to Homekit
After filtering out unnecessary Mijia entities, we can bridge HA to Homekit. For most people, the only purpose of connecting Mijia to HA is to connect Mijia and Homekit. Homekit is Apple’s native smart home protocol, which allows users to directly control home appliances on Apple devices such as iOS, Mac and Apple Watch without resorting to third-party apps. As we all know, the Homekit home ecosystem is far less prosperous than Mijia, and most products that support the Homekit protocol are expensive. Therefore, if you connect Mijia Ecosystem to Homekit, you can achieve both convenience and cost-effectiveness. HA is the best bridge between Mijia and Homekit.
To bridge the HA entity to Homekit, we need to install another integration: Homekit Bridge
. Click Settings - Devices and Integration - Add Integration, enter Homekit Bridge in the search box, and then follow the prompts to install. After the installation is complete, a QR code will pop up in the HA notification bar. Open the Home APP of the Apple device, click the plus sign in the upper right corner - Add Accessories, and scan the QR code in the notification to bridge all existing entities on the HA to the Home APP.